Blog Post

JDLab2You Designer Tools Enhance Text and Images 

JD Lab • Oct 26, 2018

If you’ve been using JDLab2You, you may have noticed a group of icons on the upper left corner of the product window. These are the Designer tools.

Designer Tools let you enhance prints by adding text, images, borders, backgrounds, drop shadows, and other effects. In fact, if you’ve ever used a pre-made template product in JDLab2You, that template was created by a graphic designer at the lab using these same Designer Tools.

Here are the basic rules you need to know about Designer Tools:


  1. Designer tools let you add, edit and delete "nodes"
  2. Nodes are boxes that contain either an image, a graphic or text
  3. The tools can only be used on most print sizes and some books
  4. One you’ve set up your nodes, you can save the design as a Favorite and reuse it

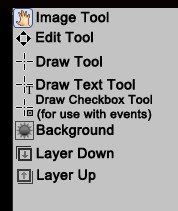
Now that you know the rules, here are the tools:

To use any tool, click it with your mouse. The tools will have a light blue box around it. As you select each tool, a Tools tab will come up on the right sie of the screen and different options will become available as described below. If you cannot select the tool, it means you are in a pre-made template, and the tools are not available.

Image Tool


The image tools is a little hand, which is meant to remind you that it can be used to grab images inside an image node. By default, the Image Tool is always selected when you first select a product, and it is always selected if you are using a pre-made template that cannot be edited.

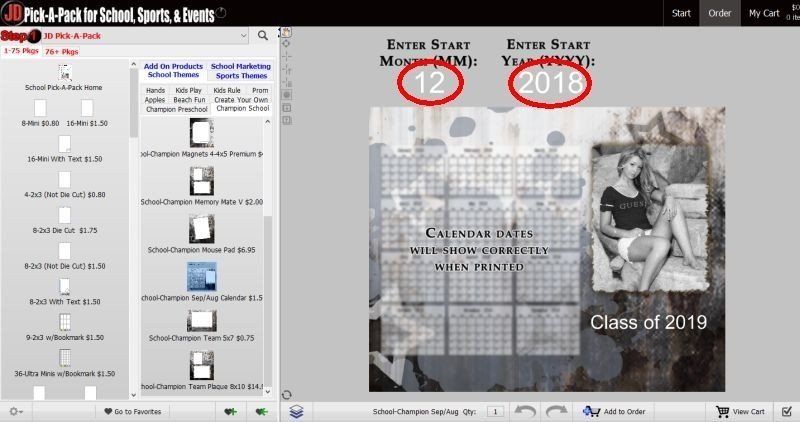
When the Image tool is selected, you can lock, crop, zoom or rotate an image. This is all done by clicking on an image, and using the Image Toolbar that appears below it:


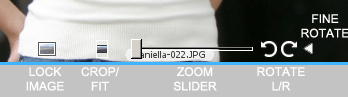
The most common use of the Image Toolbar is the “zoom slider.” You can zoom the image in by pulling the slider, then use the Image Tool to reposition the image in the node. Also, note that the little “Fine Rotation” triangle on the right changes the bottom menu so you can access the arbitrary rotation tool.

The Crop/Fit icon changes how images are positioned when they are dropped into an image node. If Crop is selected (default), JDLab2You lets you drag the image around inside the node. If Fit is selected, it will attempt to automatically best “fit” the image to the node. This is most useful if you are dragging images into template products and want to show the entire image, not just fill the node.

The Lock Image button locks an image in place in mult-node products – useful when you are working with several images and don’t want to accidentally move the wrong one.

Image Tools Pane

When an image is selected, an Image Tools tab appears on the right.


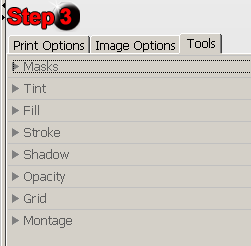
These tools allow you to add masks, tints, fills, strokes and shadows to an image, or to change its opacity. When selecting fill and stroke colors, a full-featured color wheel lets you pick an exact color, type in an RGB value, or sample a color from the image.

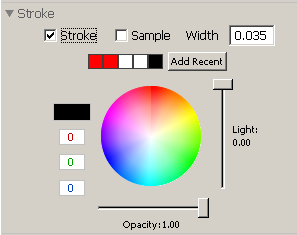
The sample color check box works like this: check the box, click on any color inside the image to record the color, then uncheck sample again. Click Add Recent to save. Once you’ve saved the sample color, you can easily select it again for fills or strokes on other images, for example.

Edit Node Tools

With the Edit tool selected you move, resize or rotate any image or text node that you have created. Click the Edit Tool, then hover your cursor over an image or text node. If the dots and line in the node is blue, you can click and drag the lower dot to reposition the node, or the upper dot to rotate the node. If the dots and lines are orange, you cannot change them.

While hovering your mouse over a node, you can also right-click (Ctrl-click on Mac) to bring up this menu.


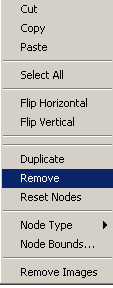
This menu lets you choose from a range of additional options such as setting specific node bounds for exact positioning, copying nodes, and flipping or removing them.

Draw Image Node Tool

The Draw Tool is used for one purpose – to click and drag a rectangle that will become a new image node. Note that once you let go of the mouse, the image node is created, and the Edit Tool is automatically selected so that you can add an image or reposition the node. If you make a mistake drawing an image node, right-click (Ctrl+Click on Mac) on the image, and select “Remove” from the menu as shown above.

Draw Text Node Tool

The Draw Text Tool works just like the Draw Image Node Tool, except that it is used to draw text nodes. Click and drag with your mouse to form a rectangular text node. When you let go of the mouse, the text node is created and the Edit tool is automatically selected so that you can add text or reposition the node. If you make a mistake drawing the text node, right-click (Ctrl+Click on Mac) on the node, and select “Remove” from the menu.

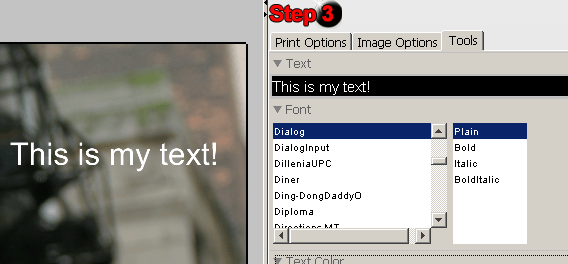
When you click on a text node, an entry box appears on the Tools tab as you start typing. There is no need to click in the text entry box, unless you need to move your cursor to edit your text. On the Tools tab you will see controls for changing the text font, style and color.

Change your mind about a node? No problem. Any empty node can be left empty, any text nodes that say “Type Text Here” can be ignored. That will not come through to us. Or you can remove them by switching to the Edit tool, right-clicking and choosing Remove.

Draw Checkbox Tool

The Draw Checkbox Tool is only used when working with Events, and will be the feature of a future Blog article.

Background

This button allows you to change the background image.

Layer Down/Up

These buttons make it easy to rearrange images and text in a complicated layout. Click any image or text node, then click the up or down buttons to move the node behind or in front of other nodes on a template.

By Max VIncent 10 Aug, 2023
Celebrating a Pioneer in the Photographic Industry: Charlie Poole
By JD Lab 01 Nov, 2019
For family, portrait and wedding photographers the holidays are the perfect time to market Christmas and holiday cards with custom images to their past clients. The challenge is that most clients don't think about the holidays until after Thanksgiving. We have your solution. Our 2019 Holiday Card Promotion give you the perfect reason to tell your clients about custom holiday cards. Order a set of holiday cards in JDLab2You and 4 of them will be free AND a free Acrylic Snowflake ornament . All styles of cards apply. You don't even need a coupon code - your extra cards and ornament will be included automatically in the order. Here's the fine print : all cards for each client must be the same design, orders must be placed on or before November 29th. Your invoice will show sets of 24 cards ordered with the discount for 4 cards automatically applied. While this is a great opportunity to market Christmas and holiday cards to your clients, you can use it to order cards for your family or studio too! How to Market Holiday Cards While our long-time pro photographers know how to use this offer, we've included the timeline below for some of our new photographers who may not have ever created a holiday card marketing campaign before. 1. Create Your Marketing Copy. Share our offer with your clients but don't discount your prices! Instead, offer the free holiday ornament in exchange for ordering early. Or offer price breaks on 48 or 96 cards. Make sure you remind them of the quality of the cards they will receive from you (our cards are amazing!). Consider offering good, better and best options. For example: offer flat cards, 5x7" folded cards, and custom designed cards. Since most people tend to purchase the "middle" option most of your orders will be for the nicest card with the least amount of customization. Let your clients know how easy it is to order custom holiday cards from you. For example, you could send them to our unbranded MyDigitalProductsOnline.com website, and tell them they can call or email you with a card name - and you'll take care of the rest. 2. Send out your Holiday Campaign. Once your holiday campaign is ready, it is time to send it out to all your lists. Electronic media (email, Facebook, etc.) should go out November 4th. Print media should be delivered on November 5th. Let clients know they must respond by November 20th for the free ornament so you can get the order in to the lab by November 30. Create a link to your Holiday Card campaign and link to it in your email signature. 3. Create sample cards for special clients in JDLab2You . If you have a select list of high-end or special clients, consider creating custom sample cards for them with their images. In JDLab2You, select a card design, add your images/text, save it to the cart, then use the Render button to create a low-res .jpg file you can email directly to your special clients.
By JD Lab 28 Oct, 2019
With the holiday season fast approaching, here are 5 things you can do today to get your marketing ready to generate additional sales. 1. Plan your Holiday Promotions . Planning works backwards. Want to have a Christmas card promotion? Customers will start shopping for their cards after Thanksgiving, so your promotions need to be in their hands by then. You need to plan those promotions today , so you can order advertising space, or get marketing materials to the printer. 2. Turn Products into Gifts. What promotions will you offer? Christmas cards are easy. But how about mini albums as gifts for newlyweds to give their parents? Take a look at our photo gifts , think of ways you can offer them to your past clients, then decide today how you'll promote them. 3. Start Working Your Email Lists & Facebook Fans. An email or a Facebook post December 1st is too late. Plan your holiday special announcements today . Start telling your fans that you are already thinking about the holidays, and ask them what they'd like you to offer. Encourage existing customers to share your Facebook page or to sign their friends and family up for your holiday specials. 4. Plan and Organize Events. Sponsoring a charity is popular during the holiday season. Whether you make your studio available to host a charity event, or offer your services for a charity auction, you need to contact local charities today . They are already making plans - you should too. 5. Partner with Local Businesses. The holidays provide a great time for complementary companies to work together. For example, you could do a cross promotion with a local custom framing company. You could subcontract the mall Santa photography concession. Or you could offer to photograph couples at corporate Christmas parties. There are lots more ideas, but they all need to be planned today . The holidays can be your most profitable season. Don't wait to plan them - you should get started today. Any new holiday marketing ideas you'd like to share? Put them in the comments below.
By JD Lab 13 Nov, 2018
Accordion Mini Photo Books are a great way for your clients to show off their images. Use these high-quality books for: A purse-sized book with the same square format as bridal albums A great gift for moms, relatives friends and brides Samples you can show your clients All our books include a magnetic cover latch that makes it easy to carry in a pocket or purse. All images are full bleed. Leatherette covers are available in black, red, caramel or indigo blue. Custom photo covers can be ordered with standard or linen paper. In addition, a no-cover option is available. Depending on the book size, up to 10 images and/or panos can be included. Accordion Mini Photo Books are available as 2.5×3.5” (wallet-sized) vertical books or 4×4” square. Prices start at only $12 for a set of 3. Order yours today in JDLab2You > Books and Albums > Accordion Mini Books
By JD Lab 13 Nov, 2018
Get in the holiday spirit with these cute Christmas tree ornaments you can offer your clients! The fancy-frame Benelux style ornament is a 3×4″ horizontal design made from aluminum, while the 3″ round ornament is made from white glossy fiberglass reinforced plastic. Both can be printed single or double-sided, and include a 6″ red ribbon. You can create your own ornament design in Photoshop, or we’ve created some holiday templates in JDLab2You to help you get started. Click here to download the ornament .PSD layout guides . The round ornaments start at $6.50, while Benelux ornaments start at $8.75. Order either of these ornaments today from the Specialty Products catalog in JDLab2You.
By JD Lab 30 Oct, 2018
Online marketing experts report that today, 20% of searches use voice. By 2020, 50% of all searches will be voice searches, and 30% of all searches will not use a screen. The rise of smart home speakers like the Amazon Echo, Google Home and Apple HomePod makes it more difficult for professional photographers to rank organically for their desired search terms. But with a bit of planning, you can be ready for it. Historically, searches were typed into Google on a keyboard and a ranked list of a results were displayed. With the advent of smart phones, searches began as a natural language question, but the results were still displayed as ranked lists on a page. With the advent of smart home speakers the rules have changed. Try this experiment. Type into Google on a desktop PC: best portrait photographer Now ask (not type) the same question on your smart phone, your Amazon Alexa, Echo, Google Home or Apple HomePod. Chances are when you spoke, you asked a normal question like (ok Google / hey Alexa) “Who’s the best portrait photographer near me?” That’s the way people talk to their smart devices. Here’s the challenge: you may not get the same answer. Smart devices assume you’re shopping for a local photographer. Google Home, Android phones and Apple iOS devices by default use the Google search engine, while Microsoft’s Cortana and Amazon’s Alexa use Microsoft Bing. If you’re using Amazon’s Alexa, it may not return any answer, since it is focused on sending shoppers to Amazon. The bottom line is that voice search has made being found by clients more complicated. In the near future, it won’t be enough to rank on Google desktop searches alone. So here are four steps you can take that will get your studio’s website ready to rank for voice searches in 2019 and beyond. 1. Sign up for Google My Business The first step is to sign up for Google My Business and start collecting Google reviews if you haven’t already done so. GMB proves to Google you are a trusted business, and Google reviews lots of 4-5 star reviews tells it you are worth paying attention to. The big difference is that on mobile devices, websites that are both top rated in GMB and “mobile friendly” will rank higher. Mobile friendly refers to your website being fast AND being optimized for mobile screens. While signing up for GMB won’t guarantee you’ll be listed on the first page of Google, if you don’t, it’s almost guaranteed that you won’t be listed. 2. Sign up for Bing Places The next step is to sign up for Bing Places . Bing searches account for about 33% of all searches online. Next sign up for Yelp. Bing relies on Yelp for local reviews. While I don’t recommend paying for Yelp ads, you should list your studio and ask clients for Yelp reviews. Like Google reviews, a number of positive Yelp reviews will tell Bing you are worth a front page local listing. 3. Create a List of Conversational Questions You need to create content on your website that answers questions clients really ask. In SEO-speak, these are called “conversational keyword queries.” For example, if I was looking for a senior photographer for my daughter, I’d type into Google: Senior photography Grand Blanc But if I’m talking to my Google home I’d say: Who’s a good senior photographer near me? Your keyword strategy should begin to focus not on short 3-4 word phrases, but on natural sounding questions: “How much does senior portrait photography cost?” “How much does a wedding photographer cost?” “How long out should I book a wedding photographer? “Where are you located?” “What are your business hours?” Certain keywords will be used much more often via voice search than traditional. Use keywords built around the following: “when,” “how,” “what,” “who,” etc. If you can’t think of questions, start writing down the questions your clients ask you over the phone. 4. Build an FAQ Page on Your Website Once you have a list of conversational questions, create a “frequently asked questions” page named yourwebsite.com/frequently-asked-questions. Copy each of the questions on this page, then provide a single sentence answer to the question, followed by 2-3 more sentences that expand on the first sentence. For example: How long out should I book a wedding photographer? Most wedding photographers and videographers suggest you book out at least 12 months to guarantee your date. While you may be able to get a photographer on short notice, the most popular dates in summer and fall tend to be booked first. Notice how the first sentence answers the question succinctly, while the second sentence provide greater detail that Google or Bing would say. On average, these should be 29 words. Keep words simple (9th grade reading level or less) and don’t use jargon so Google can pronounce them. If you have additional information, include it in a 2nd or third paragraph. What you’ve created is called a “snippet” of information. Snippets of information are not only used to voice answer questions, but to answer them on smart phones or desktops. Here’s a real world example of snippets on a desktop:
By JD Lab 30 Oct, 2018
School and sports photographers told us they liked our Champion press-printed Calendars, but wanted more flexibility on calendar dates. That’s why our newest calendar design lets you specify the month the calendar will start when you place your order. See the example above. The first month entered is December, 2018. When printed, the calendar will run from December, 2018 through November, 2019. It's that easy! To order this new calendar, download JD Pick-a-Pack , then select: School Themes > Champion School.
By JD Lab 30 Oct, 2018
Two years ago, Dan White had a problem. Dan, a Pulitzer-Prize winning photographer, was in his hometown Flint, Michigan to shoot images for an art exhibit titled, “ The Folks of Flint: A Tribute .” Shooting the images was easy. The project of documenting the “proud, hardworking, humble and giving” people of Flint as he wrote on his website had become a passion. But it would be hard to transport sixty 44×60” unframed prints from his studio in Kansas City to Michigan. White envisioned displaying the pieces on aluminum rods hung from the ceiling to give them a more organic look. Fortunately, a chance meeting between Dan and one of our staff started a long string of texts and discussions which ended with his decision to have all the files printed locally at JDLab. According to Tom Hicks at JDLab, what first drew his attention to the images was that some of them evoked the “ story behind the image ” portraiture practiced by his father and the labs founder, J.D. Hicks over 50 years ago.
By JD Lab 30 Oct, 2018
JDLab is excited to announce our new partnership with Capturelife. The addition of CaptureLife to our extensive line of products provides professional photographers with the ability to deliver quality digital content wrapped up in an elegant, single solution package. Similar to an 8×10″ or sheet of wallets, CaptureLife can be offered to your customers to increase your orders and add-on sales. However, unlike an 8×10″ or sheet of wallets, CaptureLife is an entire photo experience, delivered conveniently to your customer’s smartphone that works with your current workflow solutions and provides you residual income opportunities! CaptureLife is a great way to increase undergrad, sports, preschool, and event packages add-on sales. Any shared image can be ordered instantly. Looking for a solution to offer brides a way to share your images with their wedding guests? How about seniors who want images for Instagram or Facebook? CaptureLife makes that easy too. How does it work?
By JD Lab 29 Oct, 2018
If you have a Facebook Business page, you may have already received an email explaining that your Page’s template will be changing. According to Facebook, this new design will help you connect with the people who care most about your business on Facebook. What is a page template? The original Facebook template (left and right margin buttons, location of images, etc.) was the default for all FB business pages. However, to differentiate FB business pages, you’ve always had the option of either designing your own or purchasing 3rd-party templates. Now, Facebook has decided to create a new series of free templates depending on the kind of businesses your page represents. Since you offer a service, Facebook is recommending you use their new “services” template. The services template is designed specifically for studio’s like yours and will showcase important information about your business – like hours, services offered and directions – making it easier for people to connect with your studio. Once you receive this email, you can make the change, or Facebook will automatically update your Page layout about 4 weeks later. You can also continue to use your current template. What are the changes? Here’s JDLab’s current Facebook page. Besides the logo and hero image on top, everything in the red boxes can be changed as part of the new template.
More Posts
Share by: